Animations can emphasize points you want to make and can help make the information in your PowerPoint 2010 presentations more memorable to your audience. They can also engage viewers and capture their attention. Of course, if you go overboard with your animations, your audience may feel overwhelmed and just switch off. Use them sparingly!
Animations don’t just exist on their own. You need to apply them to an object. This object is usually a piece of text, but can be other things like a chart, a picture or even a video.
Animations come in 4 flavours:
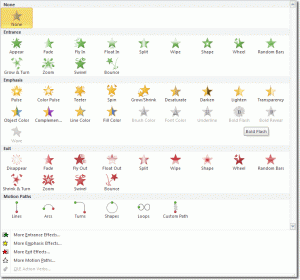
- Entrance – these animations make your object appear on your slide. For example, your object might float in.
- Emphasis – these animations bring audience attention to the animated object. For example, Pulse makes your object grow and shrink like a beating heart (just once though!).
- Exit – with an exit animation, your object leaves the slide. Fly out is an exit animation.
- Motion Path – motion path animations are a little more complex, but not much. The animated object follows a path that you define. We’ll look at these in more detail later.
Applying A PowerPoint Animation
To apply an animation to an object in your presentation, first of all select it. Now click the
Animations
tab and you should see a selection of animations in the
Animation
group. To see the entire collection of animations, click on the
More
button.

When you click the More button, you get to see the following large collection of animations:

You can use Live Previews to see what an animation will look like before applying it: all you have to do is hover over the thumbnail image of the animation to see it play once. To actually add the animation, just click on it. If you decide that you want to remove the animation, click on the None button at the top of the animations list.
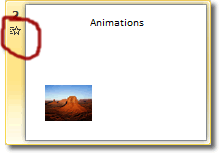
Any slides that use animations will display a whooshing star in the top left hand corner of the slide in the slides pane. This animation symbol will be familiar to you if you’ve ever added transitions to your slides.

Previewing An Animation
PowerPoint provides several ways for you to preview animations. First of all there is the live preview you see when you hover over an animation in the animations gallery. After an animation has been applied, though, you can preview it in the following ways:
- Click on the animation symbol in the image above.
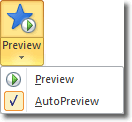
- Click the Preview Animations button in the Preview group on the Animations tab.

If you click on the top half of the Preview button, the animation will play. If, however, you click on the bottom half of the button, you’ll see some preview options (see image above). The top option (Preview), simply plays the animation. The AutoPreview option controls whether animations are played automatically when added to an object, and it affects whether a live preview is displayed too. You will probably want this option checked so that you can see what the animation looks like when previewed and applied.

