Instead of inserting a sound file and having it appear as an icon, you can assign the sound file to an object. The sound will play when the object is clicked. There is a big drawback to this method. You can only use .wav files.
The first step is to insert an object. For this example, let’s insert a picture. While the picture is still selected, click the Insert tab and then click Action (in the Links group).

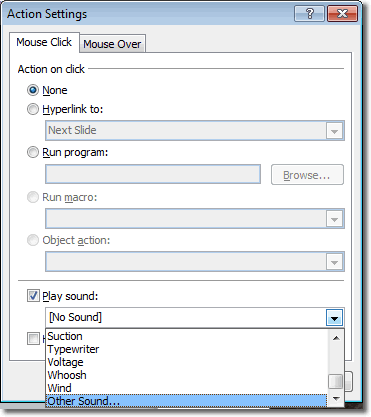
In the Action Settings panel, make sure you’re on the Mouse Click tab, check the Play sound box at the bottom and then select a sound. There are some ready made sounds for you to select from the list, but you can also choose your own sound file – as long as it’s a .wav – by selecting Other Sound. If you select Other Sound, the Add Audio dialogue box will open, and you’ll have to navigate to where the sound file is on your hard drive, select it and then click OK. The .wav will play to give you a preview of what it sounds like.
Click OK on the Action Settings window.
When you insert a sound file directly into a PowerPoint presentation, the sounds playback controls are visible. When you associate a sound file with an object, however, these controls are hidden.
Because we selected the Mouse Click tab on the Action Settings window, the sound only plays when you click the image. Also, when you run your presentation, you’ll notice that the cursor changes to a hand, indicating that the image is clickable.

